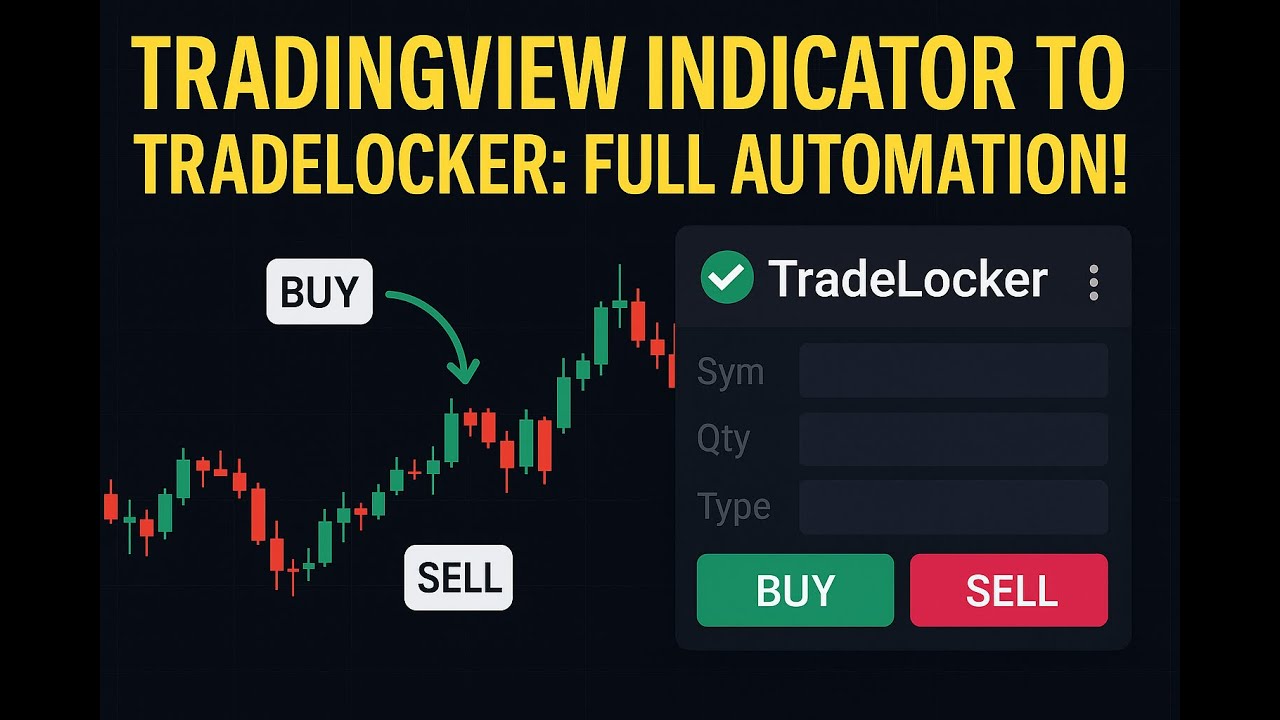
Video Step-by-Step Demo: TradeLocker Automation with TradingView – Watch Now
Trading automation has revolutionized the way traders approach the markets, enabling faster execution and disciplined strategies. If you’re looking to harness the power of automation with your TradingView indicators, this guide will walk you through setting up automated trades using the PickMyTrade indicator and TradeLocker tool. Whether you trade Forex, Crypto, or CFDs, this tutorial offers a step-by-step walkthrough to integrate your TradingView signals seamlessly with TradeLocker, making trade execution effortless and efficient.
Getting Started: Accessing TradeLocker on PickMyTrade.io
The process begins by logging into pickmytrade.io and selecting the TradeLocker option. Once on the TradeLocker homepage, your primary task is to generate alerts that will trigger automated trades. Alerts are the backbone of this automation setup — they tell the system when to buy, sell, or close positions based on your TradingView indicators or strategies.
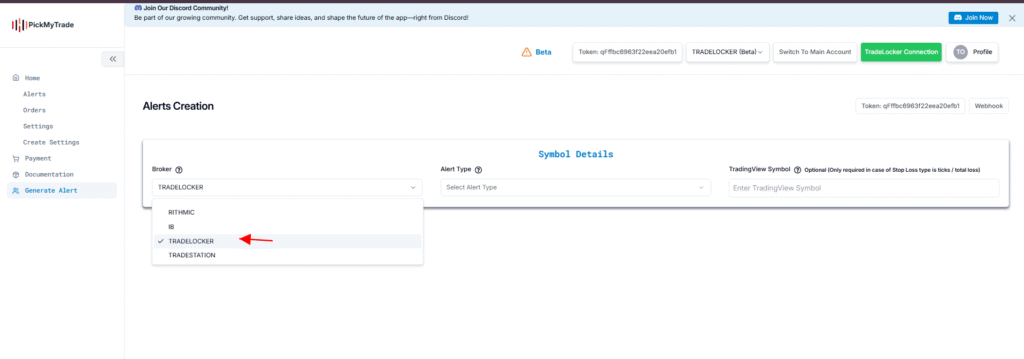
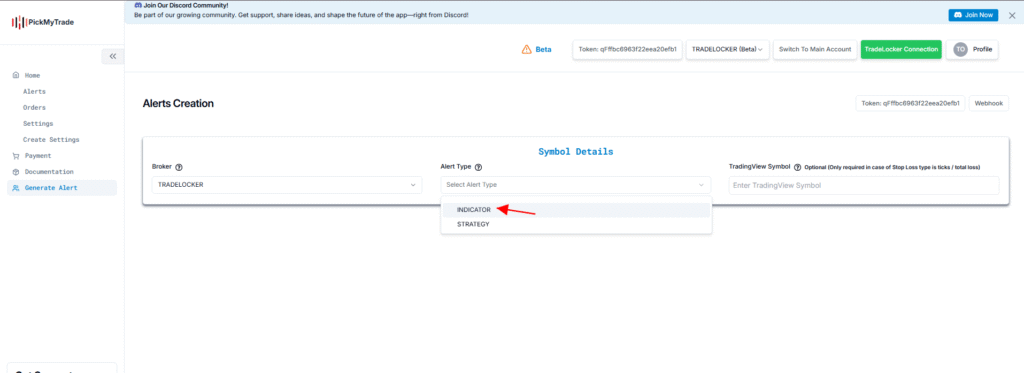
Choosing Between Indicator and Strategy Alerts
When generating an alert, you need to specify whether it is based on an indicator or a strategy. This distinction is important because indicators provide signals without backtesting data, while strategies include backtesting capabilities and simulate trade performance over historical data.
To clarify which one you have, you can check directly in TradingView:
- Add the indicator or strategy to your chart (e.g., Bollinger Bands or Bollinger Band Strategy).
- Open the Pine Script editor and look at the Strategy Tester tab.
- If the Strategy Tester shows a backtesting report, you’re dealing with a strategy; if it doesn’t, it’s an indicator.
For automation purposes, you can select either, depending on your preference. In this guide, we focus on using an indicator alert.
Selecting the Right Instrument Type
TradeLocker supports multiple instrument types, so it’s essential to select the one that matches your trading market:
- Forex: Currency pairs traded in the largest, most liquid market globally, operating 24 hours a day for five days a week.
- Equity CFD: Contracts for difference on stocks or indices. You speculate on price movements without owning the actual stock.
- Crypto: Digital currencies like Bitcoin and Ethereum, traded 24/7 with high volatility in decentralized markets.
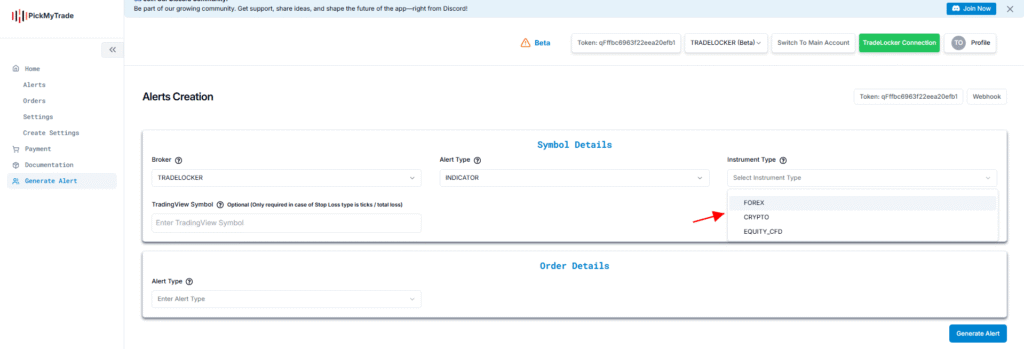
For example, if you want to trade Bitcoin against the US Dollar, choose Crypto and enter the symbol BTCUSD. If the symbol isn’t mapped yet, you can create the mapping manually in the settings.
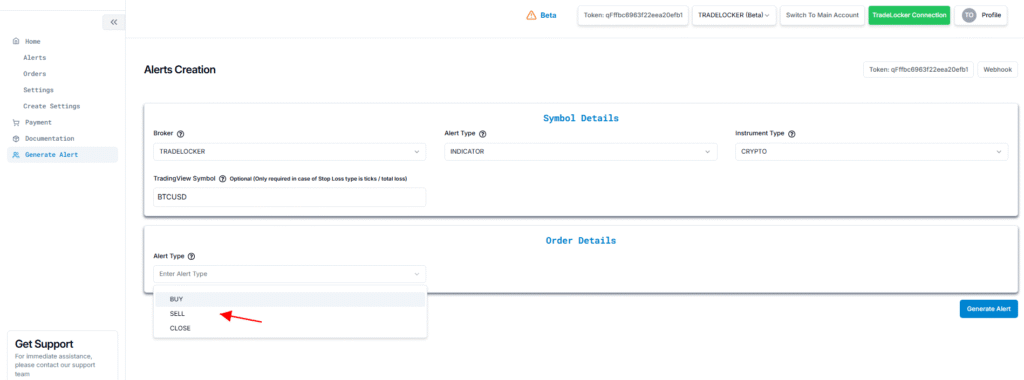
Understanding Alert Types: Buy, Sell, and Close
TradeLocker offers three alert types that dictate what happens when an alert is triggered:
- Buy: If you’re already in a buy position, triggering a new buy alert will add to your existing position. If you’re in a sell position, the system will first close the sell position and cancel all open sell orders before opening a new buy position.
- Sell: Similarly, if you’re in a sell position, a new sell alert adds to it. If in a buy position, the buy position is closed, all open buy orders are canceled, and a new sell position is opened.
- Close: This alert closes all open positions and cancels all open orders without opening any new trades.
This logic ensures your trades remain consistent with your strategy direction and risk management.
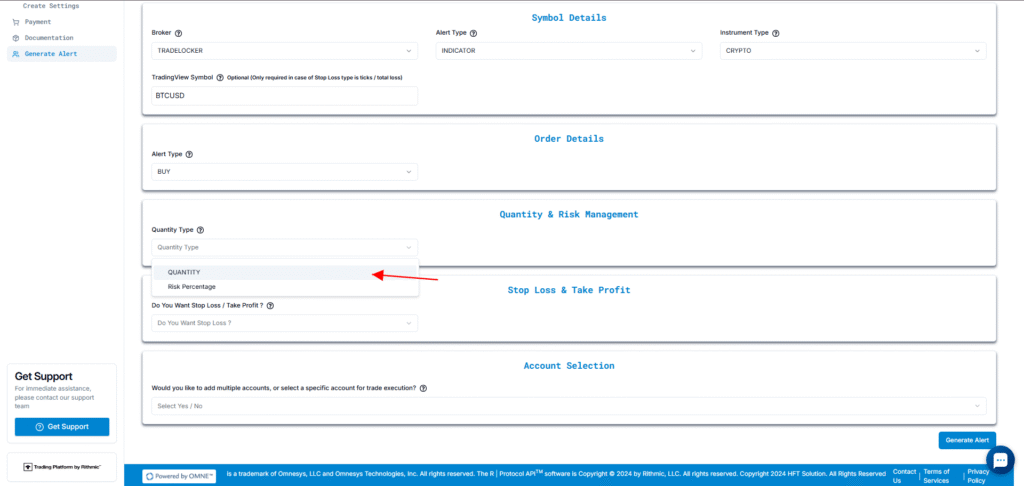
Managing Quantity and Risk: Aligning Trade Size with Your Strategy
One of the most crucial aspects of automated trading is deciding the trade size. TradeLocker allows you to customize this through two primary options:
- Quantity: You manually specify the number of contracts or lots to trade. For example, entering “1” means one contract per trade.
- Risk Percentage: The system calculates the trade size so that your maximum loss equals a fixed percentage of your total account balance, based on the stop-loss distance.
Using risk percentage is especially useful for disciplined risk management. For example, if your account balance is $100,000 and you want to risk 2% per trade, the system will size your trade so that the maximum loss is $2,000, considering your stop-loss setting.
In this guide, we select the quantity option and set it to one contract for simplicity.
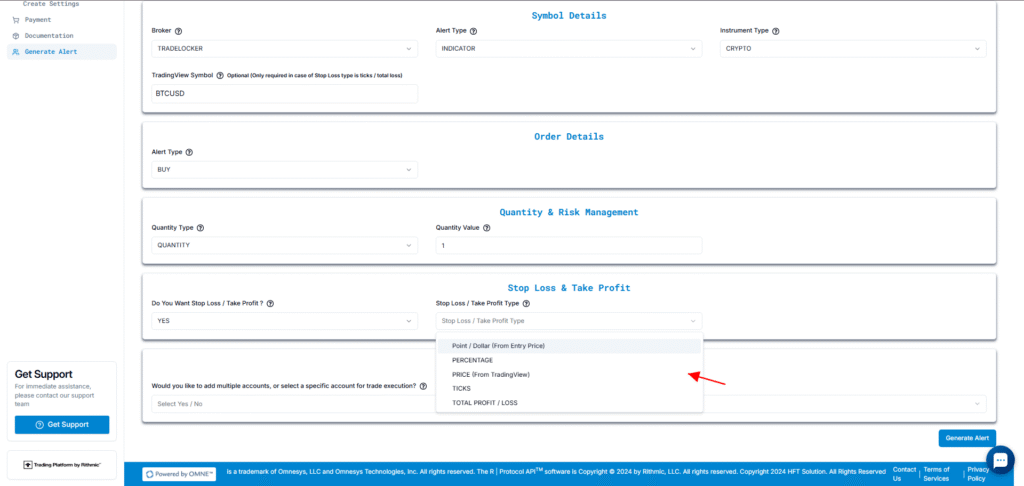
Setting Stop-Loss and Take-Profit Parameters
Proper stop-loss and take-profit levels protect your capital and lock in profits. TradeLocker offers several flexible ways to define these levels:
- Points/Dollars from Entry Price: Define fixed dollar amounts to risk or gain. For example, a $1,000 stop-loss and a $2,000 take-profit on an entry price of $90,000 means your stop-loss is at $89,000 and take-profit at $92,000.
- Percentage: Enter stop-loss and take-profit levels as percentages of the entry price. For instance, a 5% stop-loss on $90,000 equals $4,500, setting the stop-loss at $85,500.
- Price: Use placeholders from your TradingView indicator to dynamically set stop-loss or take-profit based on indicator plots. For example, using the lower Bollinger Band as a stop-loss level.
- Ticks: Define levels based on the smallest price movement unit (tick). For BTCUSD, a tick size is 0.01. Entering 10,000 ticks equals 100 points, so a stop-loss would be $89,900 if the entry price is $90,000.
- Total Profit or Loss: Specify absolute dollar amounts for total loss or profit per contract.
This flexibility allows you to tailor your risk management precisely according to your trading style and market conditions.
Using Placeholders for Dynamic Stops and Targets
If you want your stop-loss or take-profit to adjust dynamically with market conditions, you can use placeholders from TradingView alerts. For example, to set the stop-loss at the lower Bollinger Band and take-profit at the upper band:
- Go to the TradingView alerts tab.
- Click the message box and find the option to add placeholders.
- Select the appropriate plot (e.g., lower band for stop-loss, upper band for take-profit).
- Copy and paste these placeholders into the stop-loss and take-profit fields in TradeLocker.
This method ensures your exit levels adapt to ongoing market volatility and indicator signals.
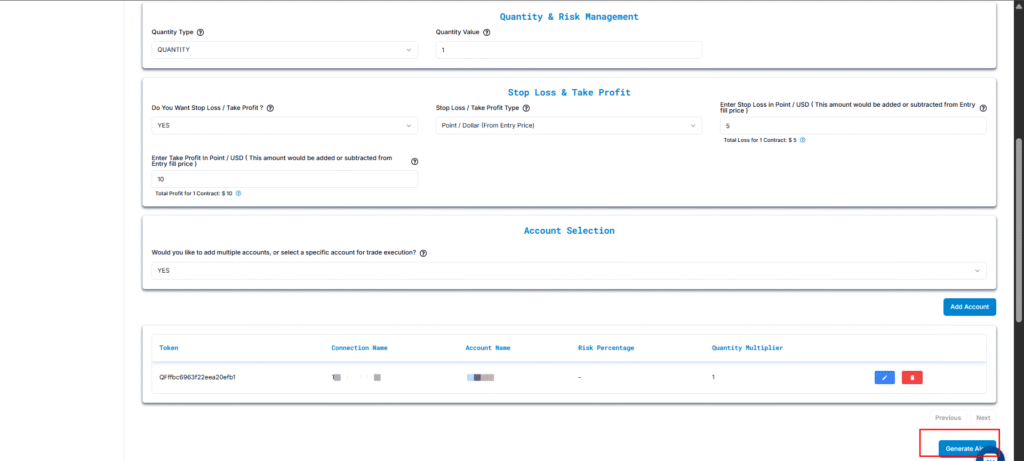
Managing Multiple Accounts and Quantity Multipliers
TradeLocker supports multiple accounts, allowing traders to execute the same strategy across different brokers or accounts simultaneously. You can add accounts in the settings and configure a quantity multiplier for each.
How does the quantity multiplier work?
- If your base quantity is 1 contract and you set the multiplier as 1 for account A and 10 for account B, TradeLocker will trade 1 contract on account A and 10 contracts on account B.
- You can scale your trade size per account according to your preferences and risk tolerance.
This feature is particularly useful for fund managers or traders who want to allocate capital differently across accounts.
Creating Alerts in TradeLocker and TradingView
Once you have configured your alert parameters, generating the alert is the next step:
- Click “Generate Alert” in TradeLocker after setting all options like instrument type, alert type, quantity, and stop-loss/take-profit.
- Copy the JSON message generated by TradeLocker.
- Go to TradingView and create a new alert on your chosen indicator or strategy (e.g., Bollinger Bands).
- In the alert creation window, set the condition to your indicator and choose “Once per bar close” for alert frequency.
- Paste the copied JSON into the alert message box.
- Copy the webhook URL from TradeLocker and paste it into the notification field in TradingView.
- Click “Create Alert” to activate it.
Repeat this process for buy and sell alerts as needed. This integration sends signals directly from TradingView to TradeLocker, which then executes trades automatically according to your predefined rules.
Monitoring and Managing Your Automated Trades
After alerts are active, you can monitor your trades on TradeLocker’s dashboard. The system will display open and closed positions, alert triggers, and other trade details.
For example, after triggering a buy alert, you will see the position reflected in the closed or open positions tab, confirming the automation is working as expected.
Conclusion: Streamline Your Trading with Automation
Automating your trades using TradingView indicators combined with TradeLocker significantly enhances your trading efficiency and discipline. By following a systematic approach to setting up alerts, managing risk, and integrating multiple accounts, you can turn your trading strategies into hands-free, real-time executions.
Whether you’re trading Forex, Crypto, or CFDs, the flexibility of TradeLocker’s alert types, quantity management, and stop-loss/take-profit configurations empowers you to customize automation tailored to your unique trading style.
Start by exploring your favorite indicators on TradingView, generate precise alerts in TradeLocker, and connect them via webhook URLs. With a few minutes of setup, you can automate complex trading strategies, minimize emotional trading mistakes, and capitalize on market opportunities 24/7.
Remember, always practice sound risk management and test your automated strategies thoroughly before committing significant capital. Happy trading!