Trading can be a fast-paced environment, and automating your strategies can give you a significant edge. If you’re using Interactive Brokers (IBKR) and want to leverage the power of TradingView’s charting and analysis tools for automated options and futures trading, then PickMyTrade is a solution worth exploring. This guide will walk you through setting up alerts and auto-executing trades, along with crucial risk management considerations.
1. Introduction to Automated Trading with IBKR, TradingView, and PickMyTrade
Automating your trades means you can execute strategies without constant manual intervention, allowing you to react to market movements instantly and potentially capitalize on opportunities even when you’re away from your screen. PickMyTrade acts as the bridge between your TradingView alerts and your IBKR account, translating your analytical signals into real trades.
This guide will cover:
- Understanding core options and futures trading concepts.
- Configuring TradingView alerts for seamless automation.
- Implementing robust risk management with stop-loss and take-profit orders.
- Setting up your IBKR account within PickMyTrade.
Whether you’re new to automated trading or looking to enhance your existing setup, this guide provides a clear path to integrating these powerful platforms.
2. Essential Concepts for Options and Futures Trading
Before diving into automation, it’s critical to understand the foundational terms for options and futures:
Options Trading Basics
| Term | Explanation | Example |
| Call Option | Gives you the right (but not the obligation) to buy an asset at a set price before a certain date. | Ideal if you expect a stock like AAPL to rise. |
| Put Option | Gives you the right (but not the obligation) to sell an asset at a set price before a certain date. | Suitable if you expect a stock like TSLA to fall. |
| Strike Price | The predetermined price at which the underlying asset can be bought or sold when exercising the option. | Crucial for setting your TradingView alerts and defining your trade entry. |
| Expiration Date | The date when the option contract expires. | Automation ensures your trades are executed and managed within the option’s lifespan. |
| Premium | The cost you pay to buy an option contract. | Optimizing your entry points can help lower this cost. |
| Lot Size | The number of underlying shares represented by one option contract (typically 100 shares). | Directly impacts your position sizing and overall exposure. |
| In-The-Money (ITM) | A Call is ITM if the stock price is above the strike. A Put is ITM if the stock price is below the strike. | These options have intrinsic value. |
| Out-Of-The-Money (OTM) | A Call is OTM if the stock price is below the strike. A Put is OTM if the stock price is above the strike. | These options have no intrinsic value and derive their value solely from time and implied volatility. |
Futures Trading Basics
| Term | Explanation |
| Futures Contract | A standardized agreement to buy or sell an asset at a predetermined price on a future date. |
| Expiration Date | The date the futures contract settles. |
| Tick Size | The smallest possible price movement for a futures contract. |
| Leverage | The ability to control a large contract value with a smaller amount of capital. |
| Margin Requirement | The minimum funds needed to open and maintain a futures position. |
Understanding these terms is fundamental for setting up accurate TradingView alerts and configuring PickMyTrade’s risk settings. It’s highly recommended to practice with IBKR’s paper trading account to test your strategies without real capital at risk.
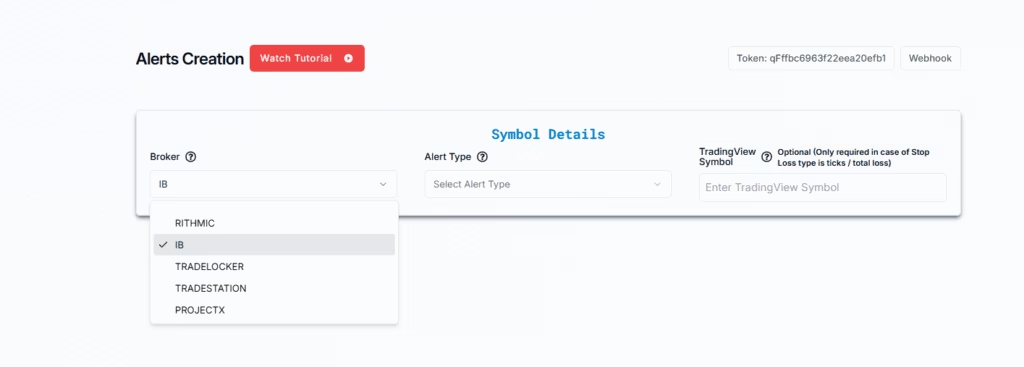
3. Choosing Interactive Brokers in PickMyTrade
Both for options and futures, the first step in PickMyTrade is consistent:
- Log in to your PickMyTrade account.
- Navigate to the broker selection section.
- Choose Interactive Brokers (IB) from the available options.
4. Setting Up TradingView Automation: Indicator vs. Strategy
PickMyTrade allows you to automate trades based on two types of TradingView alerts:
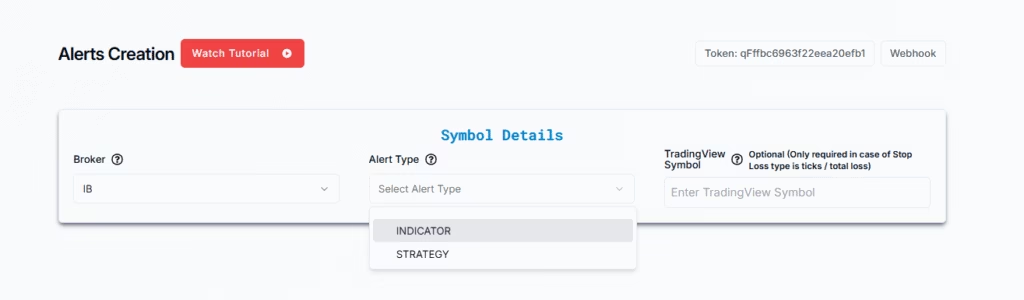
| Alert Type | Description |
| INDICATOR | Triggers based on the output of technical indicators (e.g., RSI crossovers, Moving Average signals). This is often used for simpler, direct signals. |
| STRATEGY | Triggers based on the buy/sell signals generated by a custom TradingView strategy (written in Pine Script). This is ideal for more complex, rule-based trading systems with predefined entry and exit logic. |
You’ll select your preferred alert type within PickMyTrade when configuring your automation.
5. Configuring Your Instrument Type and Symbol in PickMyTrade
Whether you’re trading options or futures, you’ll need to specify the instrument and, often, the symbol.
For Options Trading
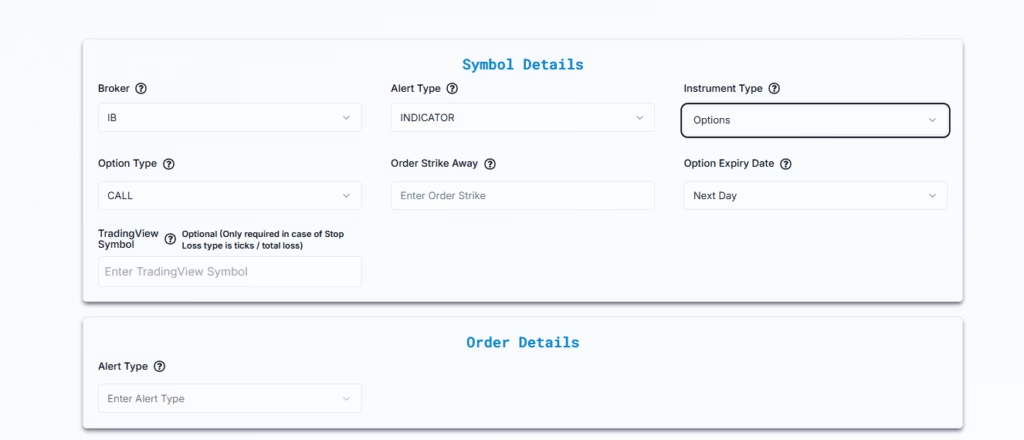
- Select “Options” from the available instrument types in PickMyTrade.
- Choose Call/Put Options:
- Call: If you’re expecting the underlying stock price to rise.
- Put: If you’re expecting the underlying stock price to fall.
- Set Strike Price Offset: This defines how the strike price relates to the current market price. PickMyTrade offers several options:
- Strike Away: Defines a strike price a specific number of levels away from the current market price (e.g., “2” for two strikes away).
- At-the-Money (ATM): Strike price is approximately equal to the market price.
- In-the-Money (ITM) Calls/Puts: Options that have intrinsic value.
- Out-of-the-Money (OTM) Calls/Puts: Options that have no intrinsic value.
- Choose Expiry Date: Select from predefined options like “Current Day,” “Next Day,” “Current Week,” “Next Month,” etc. This ensures you’re trading the desired option series.
- Define Options Contract Symbol (Optional but Recommended for SL/TP Calculations):
- You can manually enter the exact options contract symbol (e.g.,
AAPL,SPY). - Why it’s important: If you want PickMyTrade to calculate stop-loss and take-profit based on ticks or total loss, this field is required for accurate calculations.
- If left blank, PickMyTrade will execute the trade based on whatever options chart you’ve set up in TradingView for the alert.
- Flexibility: You can even send an alert from one options symbol in TradingView (e.g.,
AAPL) but configure PickMyTrade to trade a different one (e.g.,AAPL).
- You can manually enter the exact options contract symbol (e.g.,
For Futures Trading
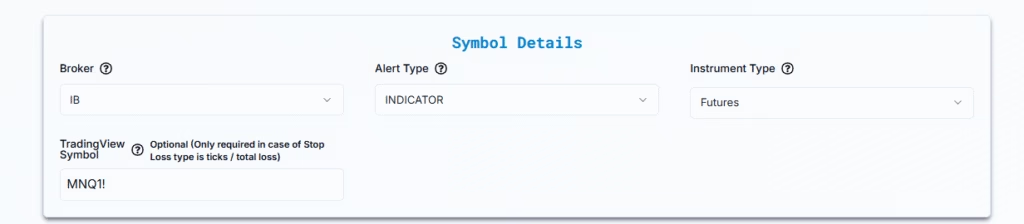
- Select “Futures” from the available instrument types in PickMyTrade.
- Enter Trading Symbol: This is where you specify the asset you want to trade (e.g.,
NQfor Nasdaq futures,ESfor S&P 500 futures).- Similar to options, this is optional but required for PickMyTrade to calculate stop-loss and take-profit based on tick size or total loss.
- You can also set up an alert on one symbol (e.g.,
NQ) and have PickMyTrade trade a related symbol (e.g.,MNQfor Micro Nasdaq futures) by entering the desired symbol in this field.
6. Defining Alert-Based Trade Action and Order Type
You’ll configure what action your TradingView alert should trigger:
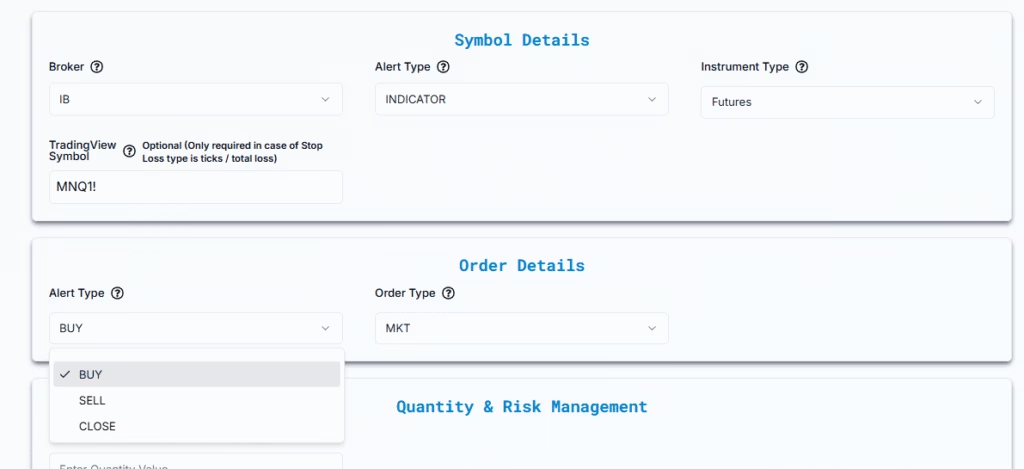
| Action | Explanation |
| Buy | Opens a new long position. |
| Sell | Opens a new short position. |
| Close | Closes an existing position and any open orders. |
Order Type for IBKR

PickMyTrade supports different order types for execution in IBKR:
- Market Order (MKT): This order type prioritizes speed of execution by filling at the best available current market price. It’s generally used when immediate execution is paramount.
- Limit Order (LMT): This order type allows you to control the execution price. Your order will only fill at your specified price or better. If the market doesn’t reach your limit price, the order won’t fill.
- Advanced LMT Features (for Futures):
- Limit to Market Wait: If your limit order isn’t filled within a specified time (e.g., 5 seconds), it automatically converts to a Market Order to ensure execution.
- Entry Offset Tick: Adjusts your limit price by a certain number of ticks relative to the current market price. This can be used to seek a better entry or increase the likelihood of a fill in fast markets.
- Advanced LMT Features (for Futures):
7. Specifying Trade Quantity
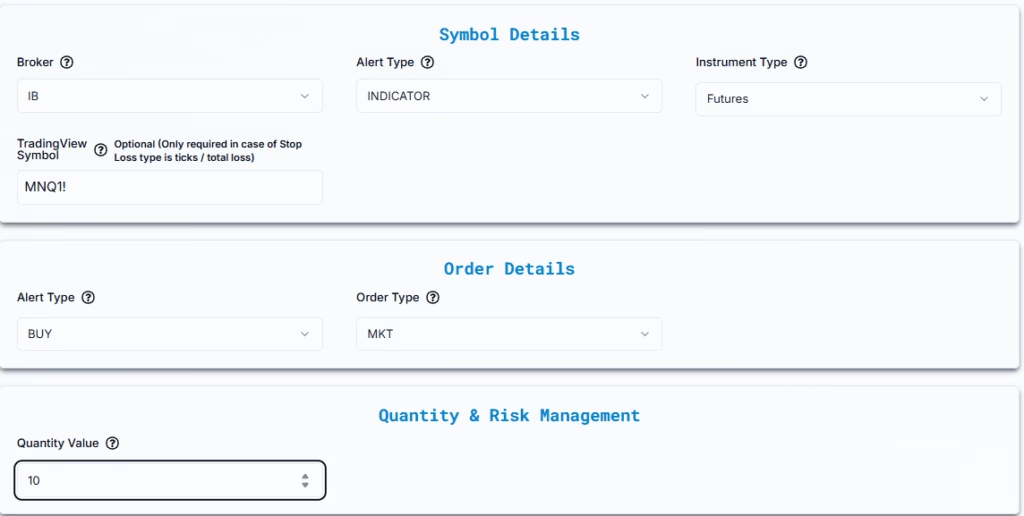
You’ll need to input the number of contracts you wish to trade for both options and futures. For example, if you enter “10”, PickMyTrade will attempt to trade 10 contracts per alert trigger.
8. Implementing Stop Loss and Take Profit (Risk Management)
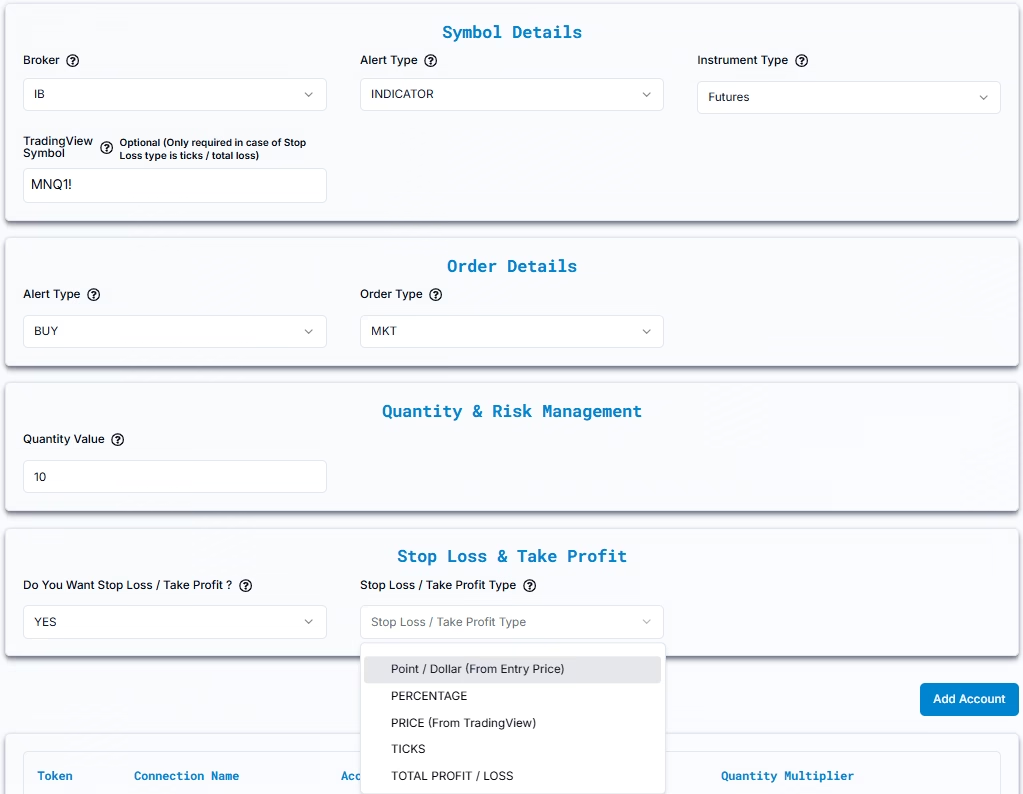
Robust risk management is crucial for any trading strategy. PickMyTrade allows you to set up stop-loss (SL) and take-profit (TP) orders directly within its configuration.
When asked “Do You Want Stop Loss / Take Profit?”, select “YES”.
You’ll then choose your Stop Loss / Take Profit Type:
A. Point / Dollar (From Entry Price)
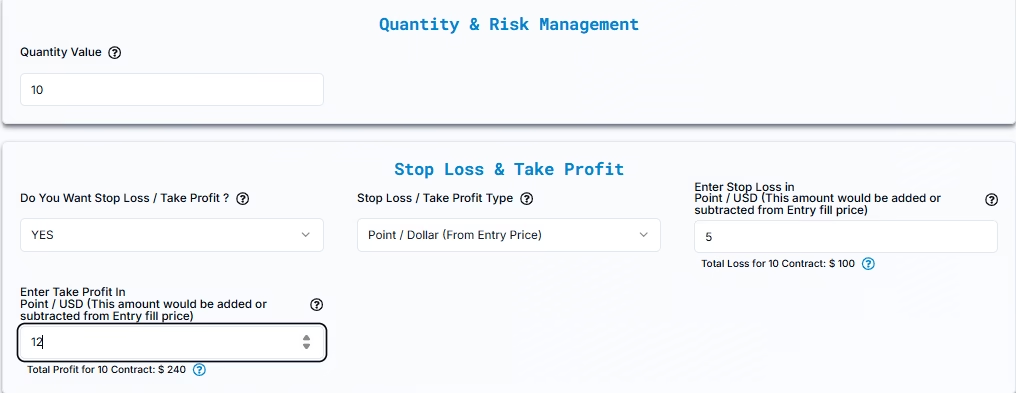
This method defines your SL/TP in absolute dollar amounts per contract relative to your entry price. The examples provided correctly calculate the total loss/profit based on the quantity.
- Stop Loss in USD: The fixed dollar amount you are willing to lose per contract if the market moves against your position.
- Example: Buy AAPL at $239.07. Set a $50 Stop Loss per contract. If you trade 10 contracts, your total potential loss would be:$50 (SL per contract)×10 (Quantity)=$500
- Take Profit in USD: The fixed dollar amount you aim to gain per contract if the market moves in your favor.
- Example: Buy AAPL at $239.07. Set a $100 Take Profit per contract. If you trade 10 contracts, your total potential profit would be:$100 (TP per contract)×10 (Quantity)=$1,000
B. Percentage
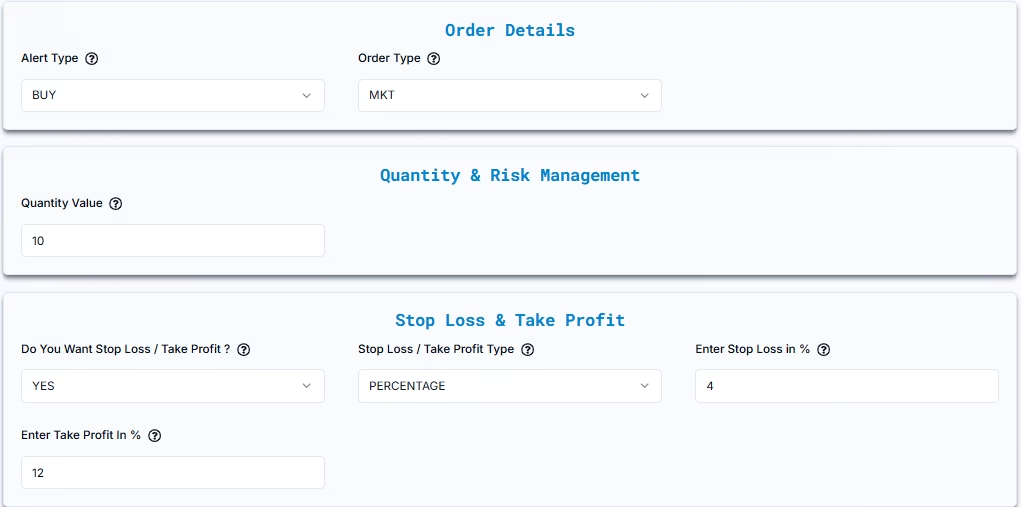
This method defines your SL/TP as a percentage of your entry price. The total dollar impact will depend on the entry price, contract value, and quantity.
- Stop Loss in %: The percentage the market price can move against your entry before the trade automatically closes.
- Example: Buy NQ at 21,891. Set a 20% Stop Loss.
- 20% of 21,891 = 21,891×0.20=4,378.20 points.
- Stop Loss Price = 21,891−4,378.20=17,512.80
- Assuming NQ has a value of $20 per point and you trade 10 contracts:
- Total potential loss = 4,378.20 points×$20/point/contract×10 contracts=$875,640 (This highlights how quickly percentages can lead to large absolute values in futures, so use with caution and understand the underlying contract value).
- Example: Buy NQ at 21,891. Set a 20% Stop Loss.
- Take Profit in %: The percentage the market price must move in your favor from the entry price for the trade to automatically close and secure profits.
- Example: Buy NQ at 21,891. Set a 100% Take Profit.
- 100% of 21,891 = 21,891×1.00=21,891 points.
- Take Profit Price = 21,891+21,891=43,782
- Assuming NQ has a value of $20 per point and you trade 10 contracts:
- Total potential profit = 21,891 points×$20/point/contract×10 contracts=$4,378,200
- Example: Buy NQ at 21,891. Set a 100% Take Profit.
C. Ticks

This method defines your SL/TP based on a specific number of ticks from your entry price. This is particularly useful for futures trading.
- Stop Loss in Ticks: The number of ticks the market can move against you before the stop loss triggers.
- Example (NQ Futures, Tick Size: 0.25 points, $5 per tick): Buy NQ at 21,891. Set a 5-tick Stop Loss.
- Point movement = 5 ticks×0.25 points/tick=1.25 points.
- Stop Loss Price = 21,891−1.25=21,889.75
- For 10 contracts, the total potential loss would be: 5 ticks×$5/tick/contract×10 contracts=$250
- Example (NQ Futures, Tick Size: 0.25 points, $5 per tick): Buy NQ at 21,891. Set a 5-tick Stop Loss.
- Take Profit in Ticks: The number of ticks the market must move in your favor for the take profit to trigger.
- Example (NQ Futures, Tick Size: 0.25 points, $5 per tick): Set a 10-tick Take Profit.
- Point movement = 10 ticks×0.25 points/tick=2.5 points.
- Take Profit Price = 21,891+2.5=21,893.5
- For 10 contracts, the total potential profit would be: 10 ticks×$5/tick/contract×10 contracts=$500
- Example (NQ Futures, Tick Size: 0.25 points, $5 per tick): Set a 10-tick Take Profit.
D. Price (for Futures/Stocks with Indicator Alerts)
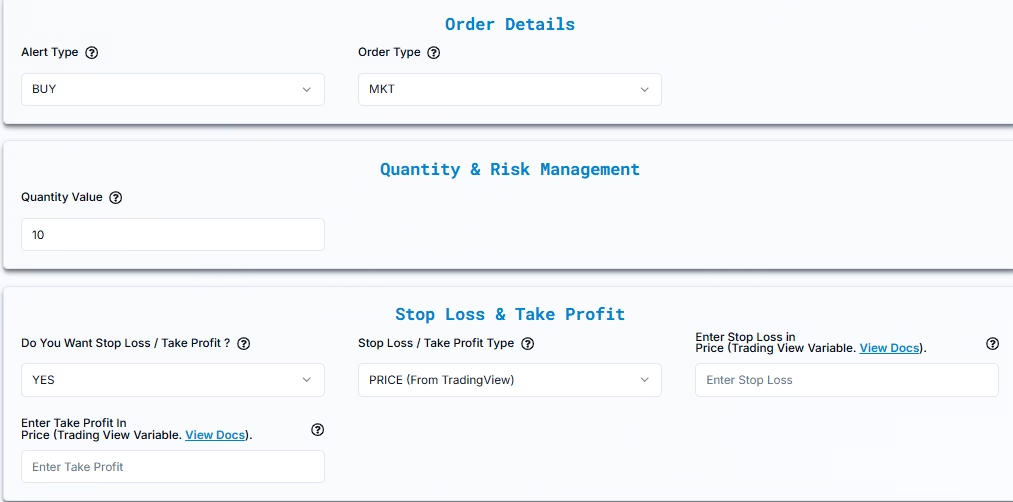
This method allows you to use dynamic price levels from your TradingView indicator plots for your SL/TP. This is powerful for strategies where SL/TP levels are determined by the indicator itself.
- Enter Stop Loss in Price (TradingView Variable): You’ll use placeholders like
{{plot_1}}or{{plot_2}}. - Enter Take Profit in Price (TradingView Variable): Similarly, you’ll use placeholders like
{{plot_0}},{{plot_1}}, etc.- How it works: In TradingView, your indicator can plot different values on the chart. These values are assigned variables like
{{plot_0}}(the first plot),{{plot_1}}(the second plot), and so on, based on their order of appearance in the indicator’s code. When setting up your alert in TradingView, you’ll place these variables (e.g.,Stop Loss: {{plot_1}},Take Profit: {{plot_2}}) directly in the alert message. When the alert triggers, PickMyTrade will receive the actual real-time price values associated with those plots at that precise moment and apply them as your stop-loss and take-profit levels.
- How it works: In TradingView, your indicator can plot different values on the chart. These values are assigned variables like
E. Total Profit / Loss (USD per Contract)
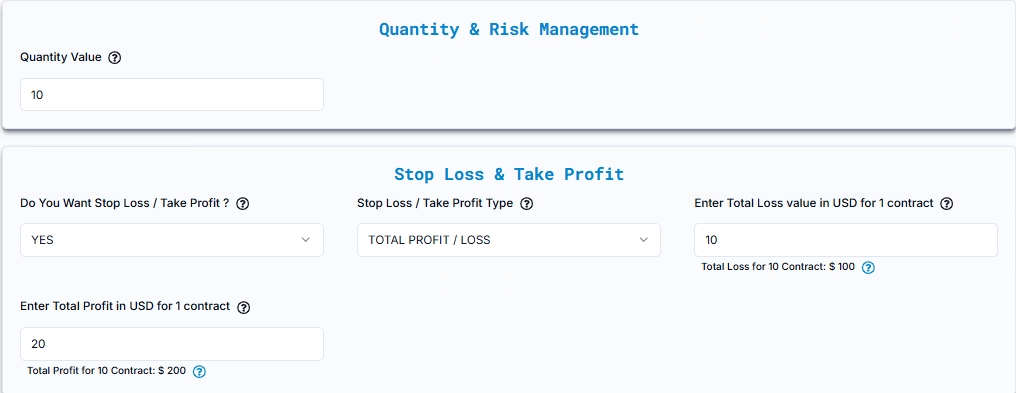
This method defines your SL/TP as a total dollar amount per trade, distributed across your contracts. It implicitly calculates the necessary price movement.
- Total Loss per Contract: The maximum dollar amount you’re willing to lose per contract. The total potential loss for the trade will be this amount multiplied by your quantity.
- Example (NQ Futures, $20 per point): Willing to lose $100 per contract.
- For 10 contracts, total potential loss for the trade = $100/contract×10 contracts=$1,000.
- The corresponding stop-loss price calculation:
- Loss per point per contract = $20.
- Points to move for $100 loss = $100/$20/point=5 points.
- Stop Loss Price = Entry Price (21,891) −5 points=21,886.
- Example (NQ Futures, $20 per point): Willing to lose $100 per contract.
- Total Profit per Contract: The target dollar amount you’re aiming for per contract. The total potential profit for the trade will be this amount multiplied by your quantity.
- Example (NQ Futures, $20 per point): Targeting $200 per contract.
- For 10 contracts, total potential profit for the trade = $200/contract×10 contracts=$2,000.
- The corresponding take-profit price calculation:
- Profit per point per contract = $20.
- Points to move for $200 profit = $200/$20/point=10 points.
- Take Profit Price = Entry Price (21,891) +10 points=21,901.
- Example (NQ Futures, $20 per point): Targeting $200 per contract.
9. Managing Strategy Exits (for Strategy-Based Automation)
If you’re using a TradingView strategy (not just an indicator) for automation, you’ll need to tell PickMyTrade how the exits are handled:
- Multiple Exits (e.g., TP1, TP2)?
- Yes: If your strategy already defines multiple take-profit or stop-loss levels, PickMyTrade will not prompt you for additional SL/TP settings. Your strategy’s built-in exit logic will govern the trades. Keep in mind that IB typically supports only one SL and one TP order attached to an entry order.
- No: If your strategy does not handle exits internally, you must configure Stop Loss and Take Profit settings manually in PickMyTrade (using the options discussed in Section 8).
10. Selecting Your Interactive Brokers Account(s)
PickMyTrade offers flexibility for managing your IBKR accounts:
- Single Account: Select your primary IBKR account for trade execution.
- Multiple Accounts: You can configure PickMyTrade to distribute trades across multiple IBKR subaccounts linked under a single IB login or even across entirely separate IBKR accounts under different PickMyTrade logins.
- For IB Subaccounts (under one PickMyTrade Login):
- Choose the PickMyTrade Connection Name for the desired subaccount.
- Use a Quantity Multiplier to adjust the number of contracts proportionally for each account (e.g., 1.5x, 2.0x).
- For Separate IB Accounts (under different PickMyTrade Logins):
- Enter the unique PickMyTrade Token associated with each account.
- Specify the PickMyTrade Connection Name.
- Set a Quantity Multiplier for each account to define how the contract size should be adjusted.
- For IB Subaccounts (under one PickMyTrade Login):
11. Generating and Decoding the Automation Alert (JSON Payload)
Once all your settings are configured in PickMyTrade, click “Generate Alert.” PickMyTrade will then produce a JSON (JavaScript Object Notation) payload. This is the coded message that TradingView will send to PickMyTrade to trigger your automated trade.
Here’s a breakdown of common parameters you’ll see in the JSON payload, along with what they mean for both options and futures:
{
  "symbol": "AAPL", // Or "NQH6" for futures
  "date": "{{timenow}}",
  "data": "buy", // "buy", "sell", or "close"
  "quantity": 10,
  "risk_percentage": 0, // 0 for manual quantity, >0 for risk-based sizing
  "price": "{{close}}", // Or specific entry price

  "tp": 0, // Fixed TP price (0 if not used)
  "percentage_tp": 100, // TP as % of entry price
  "dollar_tp": 100, // TP in dollar value

  "sl": 0, // Fixed SL price (0 if not used)
  "percentage_sl": 50, // SL as % of entry price
  "dollar_sl": 50, // SL in dollar value

  "entry_offset": 0, // For limit order adjustments
  "lmt_to_market_wait": 0, // For limit order conversion
  "order_type": "MKT", // "MKT" or "LMT"
  "update_tp": false,
  "update_sl": false,
  "token": "<YOUR_API_TOKEN>", // Your PickMyTrade API token
  "duplicate_position_allow": false,

  "platform": "IB",
  "inst_type": "OPT", // Or "FUT" for futures
  "place_order_at": "away_strike", // For options: "away_strike", "ATM", "ITM", "OTM"
  "reverse_order_close": false, // Closes opposite position before new order

  "multiple_accounts": [
    {
      "token": "<YOUR_ACCOUNT_API_TOKEN>",
      "account_id": "sdfghjkknx",
      "connection_name": "qwecfghvxs",
      "risk_percentage": 0,
      "quantity_multiplier": 10
    }
  ],

  "option_type": "call", // Only for options: "call" or "put"
  "expiry_date": "T1", // Only for options: expiry type (e.g., "T1" for Next Day)
  "order_strike": 237.30 // Only for options: specific strike price
}
This JSON payload is what you’ll copy and paste into your TradingView alert’s webhook message box.
12. Setting Up TradingView Alerts for Automated Trading
The final step is to configure the alert in TradingView itself:
- Open your TradingView chart with the desired indicator or strategy applied.
- Right-click on the chart and select “Add Alert,” or use the alarm clock icon on the toolbar.
- In the “Condition” section, select your indicator or strategy and the specific condition that should trigger the alert (e.g., “My Indicator Buy Signal,” “Strategy Long Entry”).
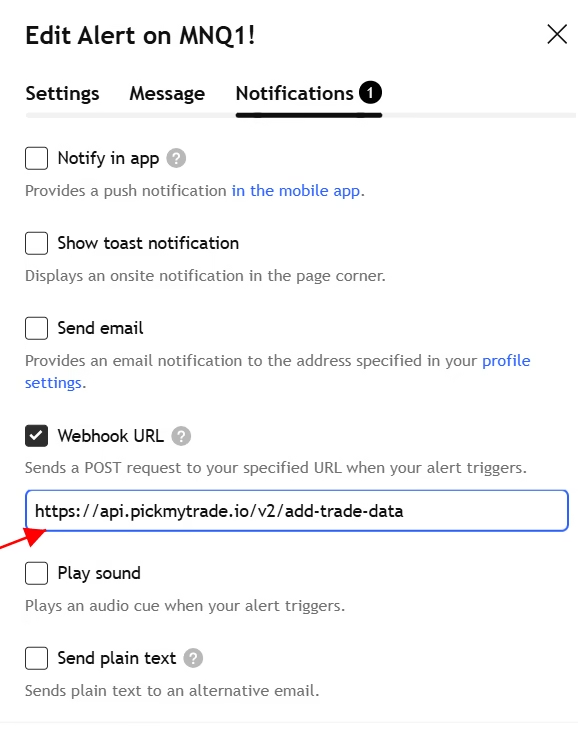
- In the “Actions” section, check “Webhook URL.”
- Enter the PickMyTrade Webhook URL provided by PickMyTrade (this is a universal URL to which all your alerts will be sent).
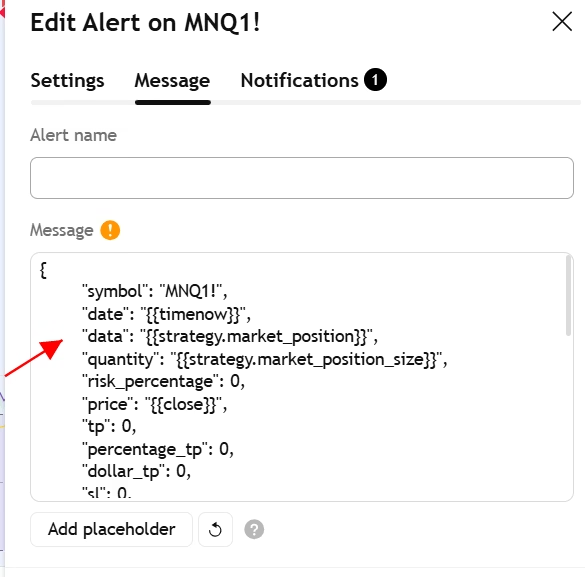
- In the “Message” box, paste the JSON payload you generated from PickMyTrade.
- Give your alert a name for easy identification.
- Click “Create.”
Now, whenever your TradingView alert condition is met, it will send this JSON message to PickMyTrade, which will then execute the trade in your Interactive Brokers account according to your predefined settings.
13. Troubleshooting and Support
If you encounter any issues:
- Connection Issues: Ensure your IBKR account is active, your PickMyTrade connection is configured correctly, and both platforms have the necessary permissions. Often, simply reconnecting can resolve minor glitches.
- JSON Errors: Double-check that you’ve copied the JSON payload exactly as generated by PickMyTrade into your TradingView alert message.
- Trade Not Executing: Verify your trade quantity, SL/TP settings, and ensure there’s sufficient margin/capital in your IBKR account.
- Need Help? PickMyTrade offers support:
- Email:
[email protected] - Discord Community: Join their Discord channel to connect with other users and get assistance.
Click here
- Email:
By following these steps, you can confidently set up automated options and futures trading with Interactive Brokers, leveraging the powerful capabilities of TradingView and PickMyTrade. Always remember to start with paper trading to validate your setup and strategies before deploying real capital.
You May also Like:
TradeStation Review (2025): Unlocking Advanced Trading Tools
Rithmic vs Tradovate: Ultimate 2025 Comparison Guide for Traders
Automating Trades on TradeLocker with PickMyTrade
TopstepX 2025 Review: How ProjectX Enhances Futures Trading